
Golf
The Course
Arthur Jackson, born in Scotland, laid out the first nine holes in 1911 on the ridges south of McAlester. The back nine came later. Nothing about the property is flat.
The course rewards a player who can hold a slope. Bermuda fairways run fast in July, the greens are small by modern standards, and the elevation change means very few level lies. The MCC Invitational, played here every year since 1958, is still the event that fills the parking lot.
At a glance
Par
70
Front / back
35 / 35
Tee sets
Four
Architect
A. Jackson, 1911
Scorecard
each table scrolls sideways on a phone
Front nine
| Hole | 1 | 2 | 3 | 4 | 5 | 6 | 7 | 8 | 9 | Out |
|---|---|---|---|---|---|---|---|---|---|---|
| Par | 3 | 4 | 3 | 5 | 4 | 5 | 4 | 4 | 3 | 35 |
| Champ. | 167 | 382 | 150 | 555 | 385 | 500 | 379 | 272 | 150 | 2940 |
| Back | 160 | 375 | 129 | 512 | 339 | 452 | 358 | 259 | 136 | 2720 |
| Middle | 160 | 350 | 114 | 480 | 301 | 409 | 323 | 255 | 117 | 2509 |
| Forward | 155 | 337 | 95 | 405 | 255 | 373 | 244 | 193 | 98 | 2155 |
| Handicap | 14 | 6 | 18 | 12 | 2 | 10 | 4 | 16 | 8 | — |
Back nine
| Hole | 10 | 11 | 12 | 13 | 14 | 15 | 16 | 17 | 18 | In |
|---|---|---|---|---|---|---|---|---|---|---|
| Par | 3 | 4 | 5 | 3 | 4 | 3 | 4 | 4 | 5 | 35 |
| Champ. | 218 | 368 | 525 | 215 | 335 | 212 | 415 | 383 | 462 | 3133 |
| Back | 198 | 320 | 489 | 149 | 325 | 185 | 396 | 365 | 446 | 2873 |
| Middle | 164 | 307 | 407 | 120 | 317 | 164 | 333 | 345 | 423 | 2580 |
| Forward | 132 | 259 | 373 | 110 | 259 | 156 | 289 | 313 | 400 | 2291 |
| Handicap | 7 | 5 | 1 | 15 | 13 | 9 | 3 | 11 | 17 | — |
Hole by hole
1
Par 3
155
Forward
160
Middle
160
Back
167
Champ.
The first hole at McAlester Country Club is an inspiring tee shot from an elevated tee surrounded by the historic clubhouse. The large tee box provides a variety of looks from this notably aesthetic design.
2
Par 4
337
Forward
350
Middle
375
Back
382
Champ.
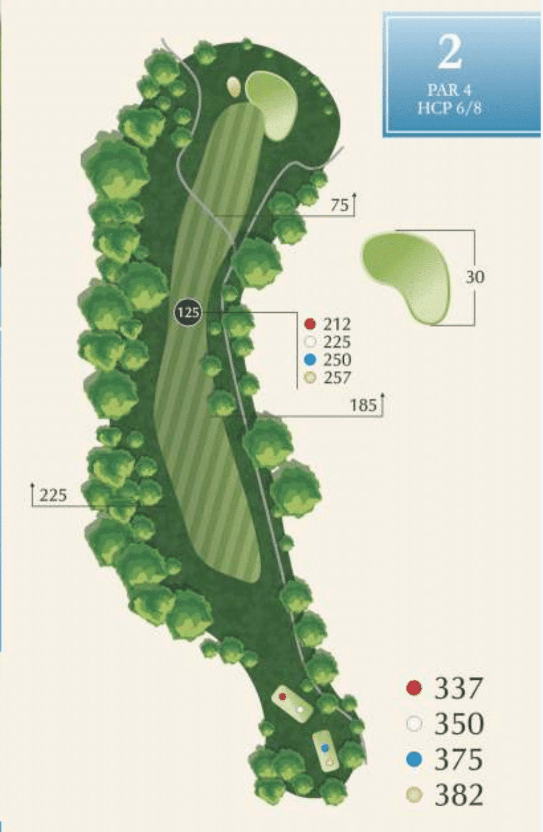
Perhaps the most challenging tee shot awaits the player at this dogleg right design. Large pines line both sides of this narrow fairway, placing a premium on the tee shot. A well-placed drive will leave a medium iron to a narrow green protected by two front bunkers.
3
Par 3
95
Forward
114
Middle
129
Back
150
Champ.
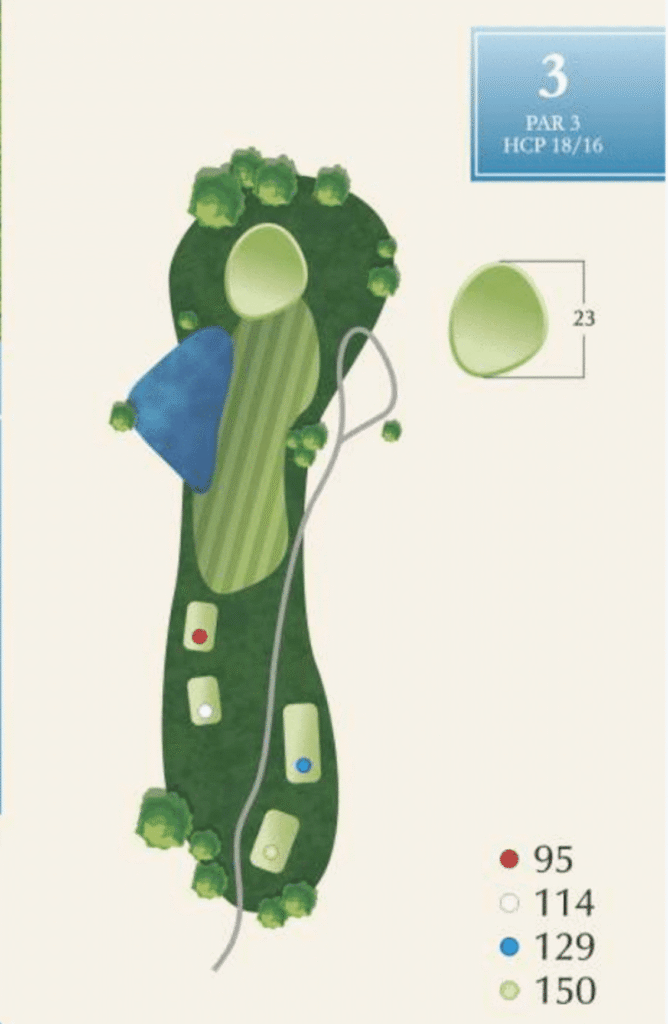
This short par 3 is protected by a small pond to the left of this difficult green. Club selection is crucial as trouble awaits an errant shot over the back of this sloping layout.
4
Par 5
405
Forward
480
Middle
512
Back
555
Champ.
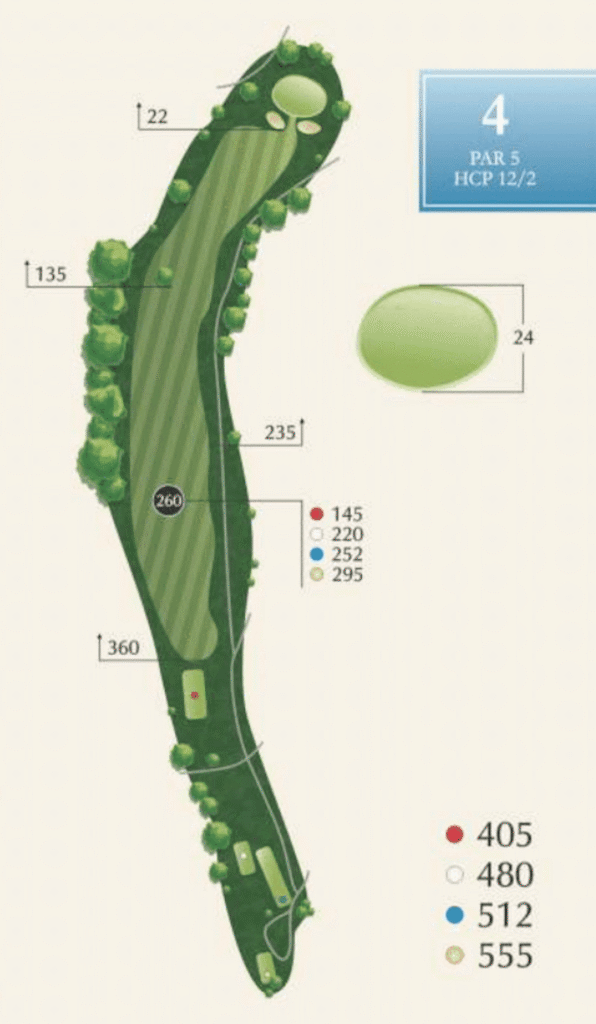
This par 5 doglegs slightly to the right. It is the longest hole on the course and one of the most demanding in terms of the second shot. A large plotting of trees protects the green from an aggressive shot.
5
Par 4
255
Forward
301
Middle
339
Back
385
Champ.
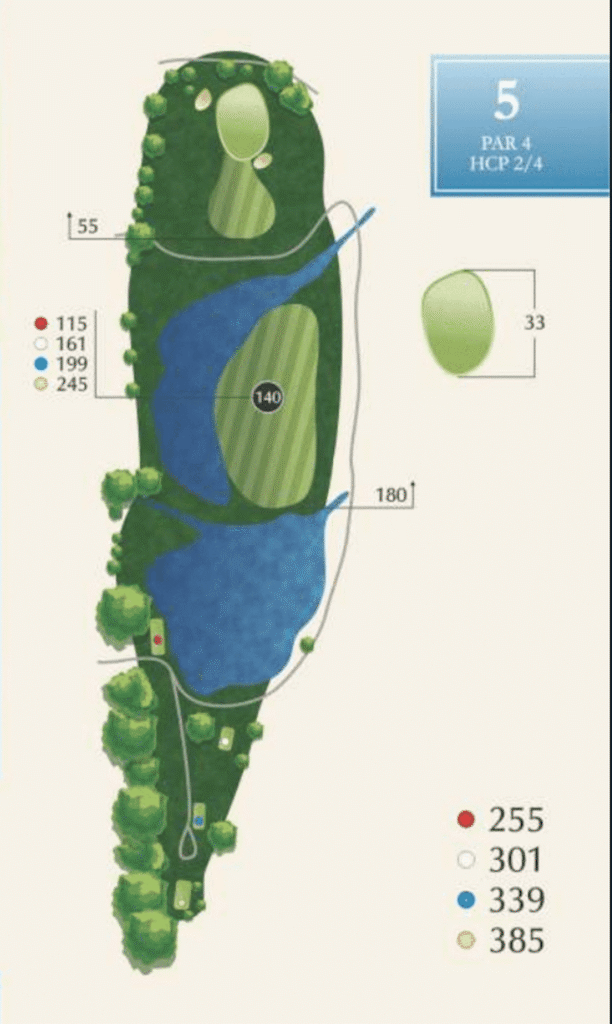
This hole is probably the most intimidating on the golf course. Tournament players often begin to visualize this tee shot well before reaching the teeing ground. Players must carry a large pond before reaching a generous landing area. The approach shot then provides another challenge. The green is largely elevated making distance perception difficult. The green is two-tiered making putting difficult. A par on this number two handicap hole is an accomplishment as the hole averages 5.3 regularly.
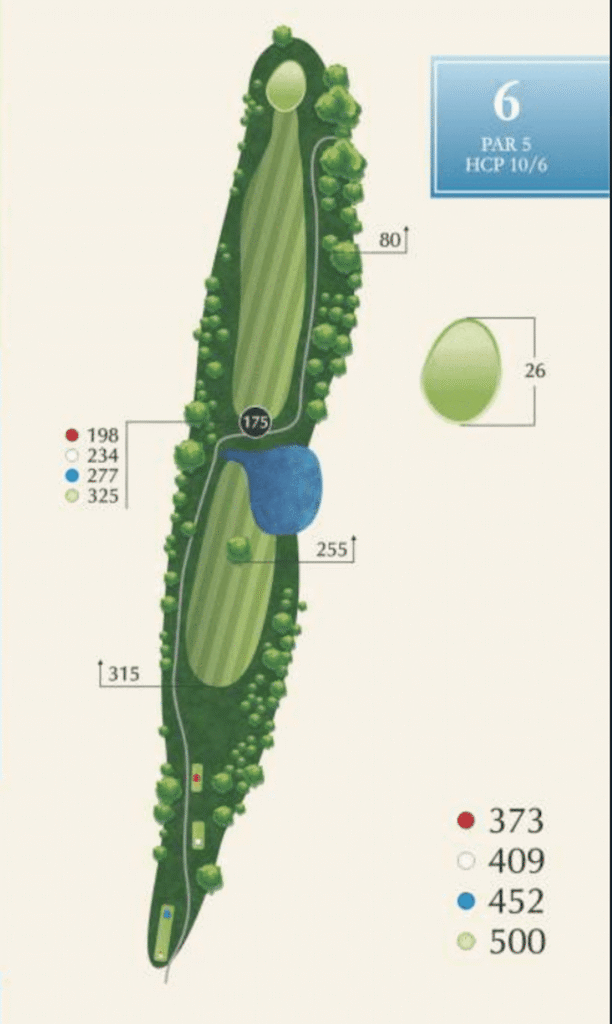
6
Par 5
373
Forward
409
Middle
452
Back
500
Champ.
The sixth hole at McAlester Country Club is a narrow par 5 that demands accuracy from tee to green. Players must place their tee shot approximately 220 yards from the back tee and avoid a well-positioned oak tree protecting the left center of the fairway. This is the perfect “lay-up par-5” as longer hitters may gamble to carry the pond leaving only a short iron to the green.
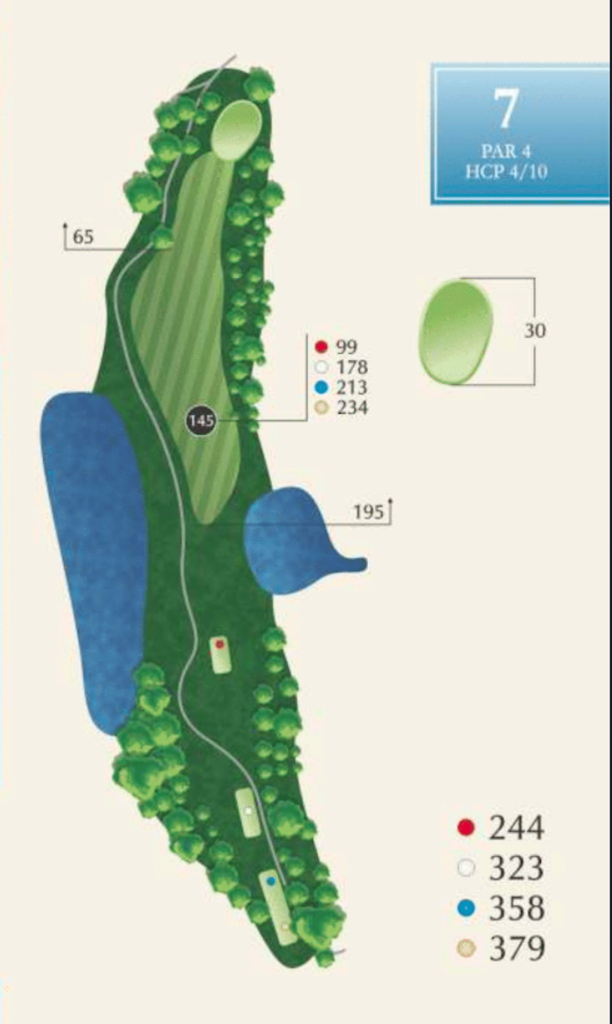
7
Par 4
244
Forward
323
Middle
358
Back
379
Champ.
This par 4 dogleg right is picturesque from its elevated tee. A sloping fairway awaits the tee shot and the green sits elevated. A short iron approach is ideal into this green providing an excellent opportunity for a birdie.
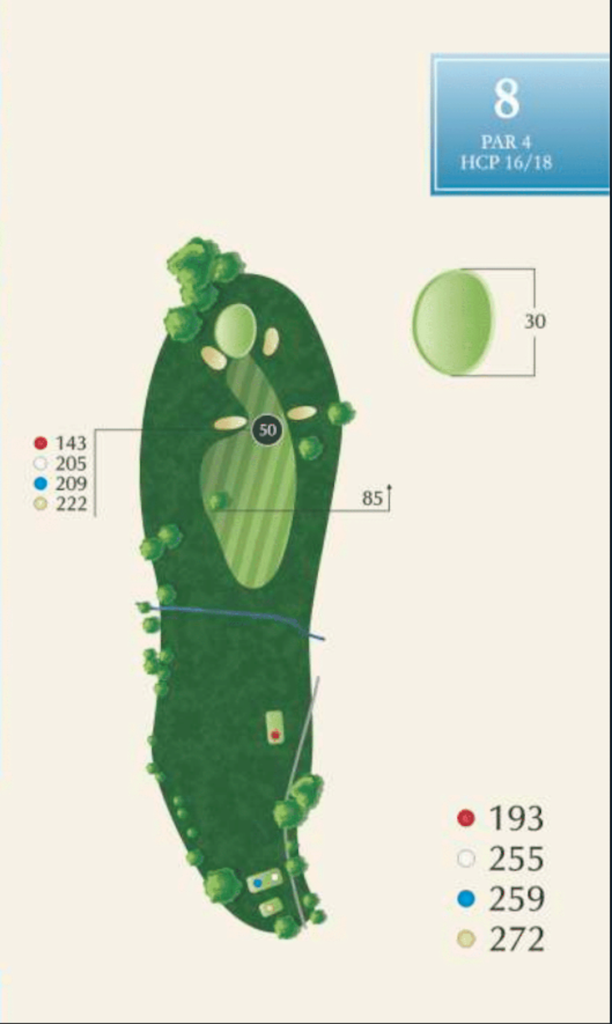
8
Par 4
193
Forward
255
Middle
259
Back
272
Champ.
This is the shortest par 4 on the golf course. Two well-positioned fairway bunkers require players to accurately place their tee shots. This green is two-tiered, but with half wedge approach shots birdies are common.
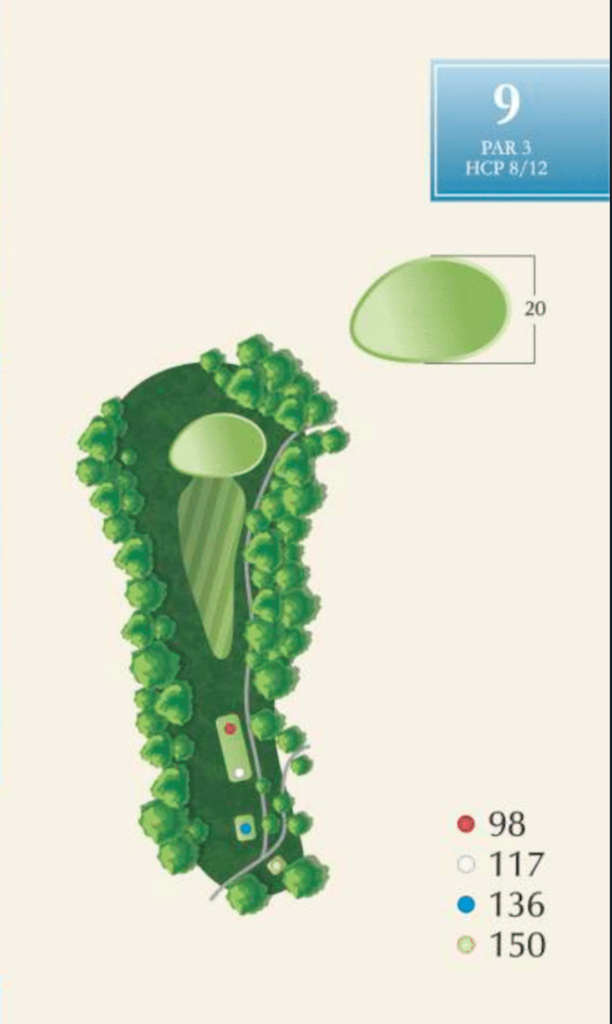
9
Par 3
98
Forward
117
Middle
136
Back
150
Champ.
The final hole on the front nine is an uphill all the way par 3. Club selection is vital as players can only see the top of the flagstick. The green, however, is difficult to read and even the closest of birdie putts require precision.
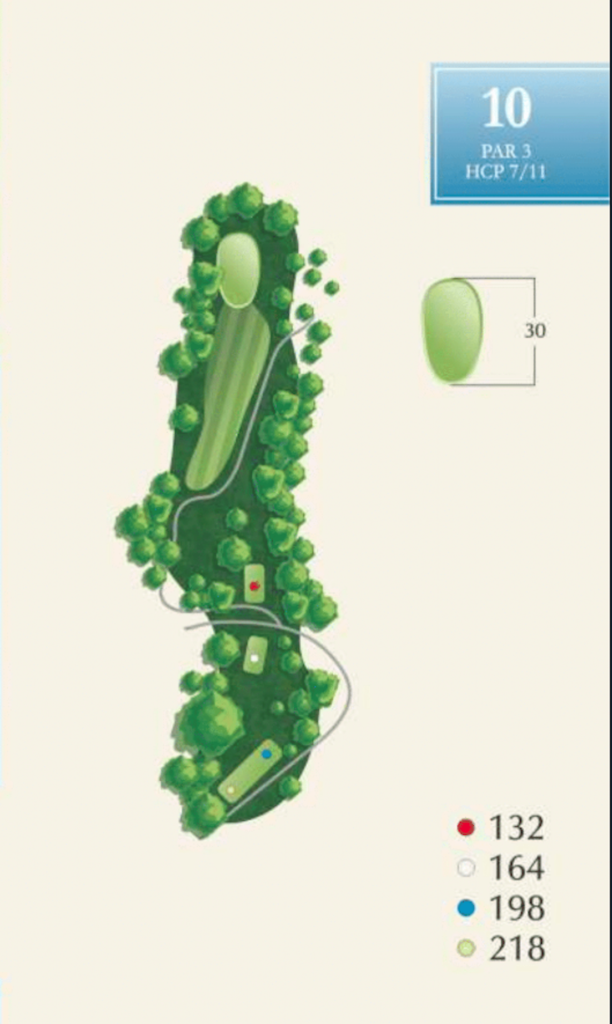
10
Par 3
132
Forward
164
Middle
198
Back
218
Champ.
This par 3 is elevated and the prevailing south wind provides for a difficult tee shot. Long irons and hybrids are the clubs of choice on this demanding par 3. With out-of-bounds left, and a hazard to the right, players are forced to execute perfectly in order to walk away with par or bogey.
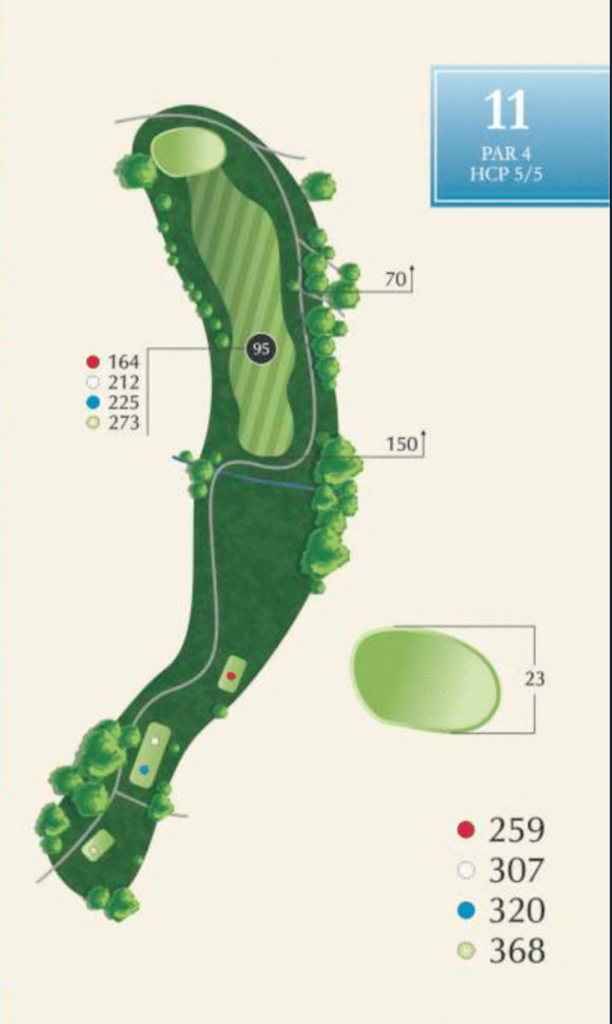
11
Par 4
259
Forward
307
Middle
320
Back
368
Champ.
A downhill, dogleg left par 4 awaits the players at the 11th tee. Trees protect both sides of the fairway and even a perfect tee shot leaves the player with a demanding approach to a difficult green.
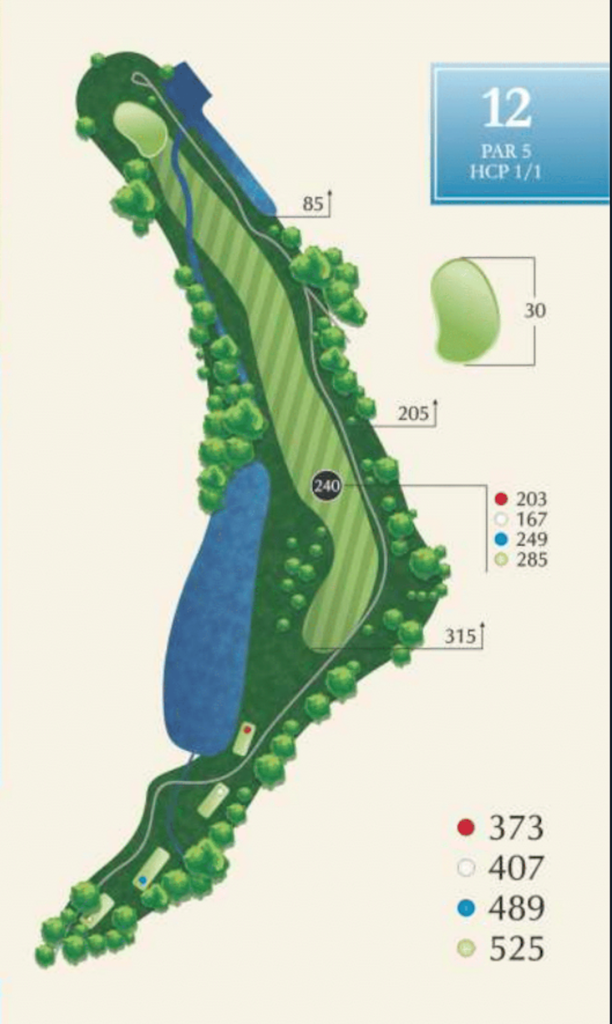
12
Par 5
373
Forward
407
Middle
489
Back
525
Champ.
Selected by the USGA as the most difficult hole on the course, the 12th is a winding par five with water lurking from tee to green. Placement is the key on every shot. After a well-executed tee shot, players are faced with a difficult lay-up. A creek protects the left side of the fairway and out-of-bounds stakes guard the right. The beautiful green looks inviting to the longer hitters, but with trouble in front a solid lay-up is the smart play.
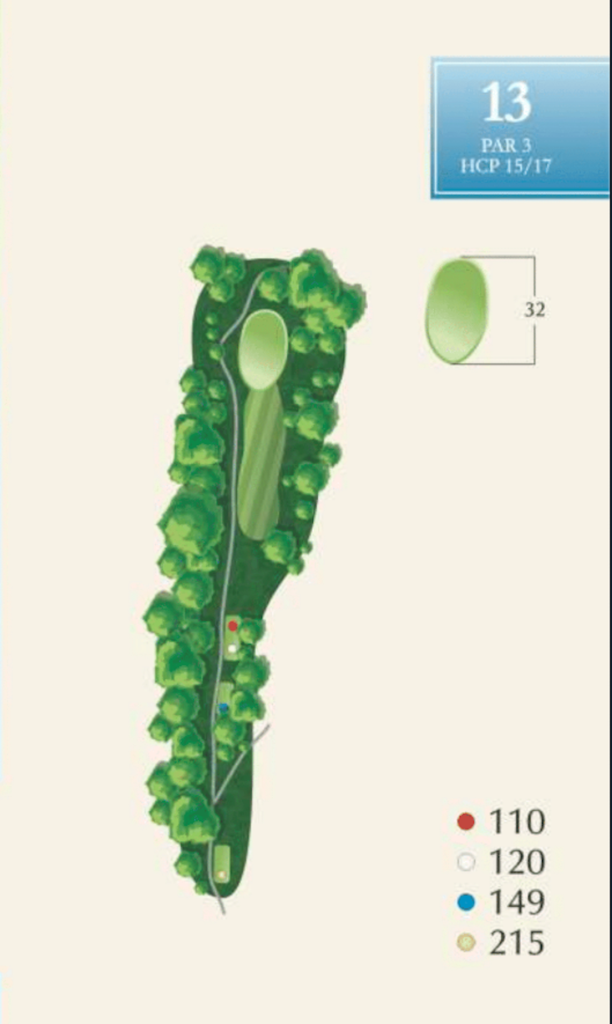
13
Par 3
110
Forward
120
Middle
149
Back
215
Champ.
This par 3 requires players to hit the most accurate of tee shots. The green is small and an errant approach will require a skillful pitch to save par.
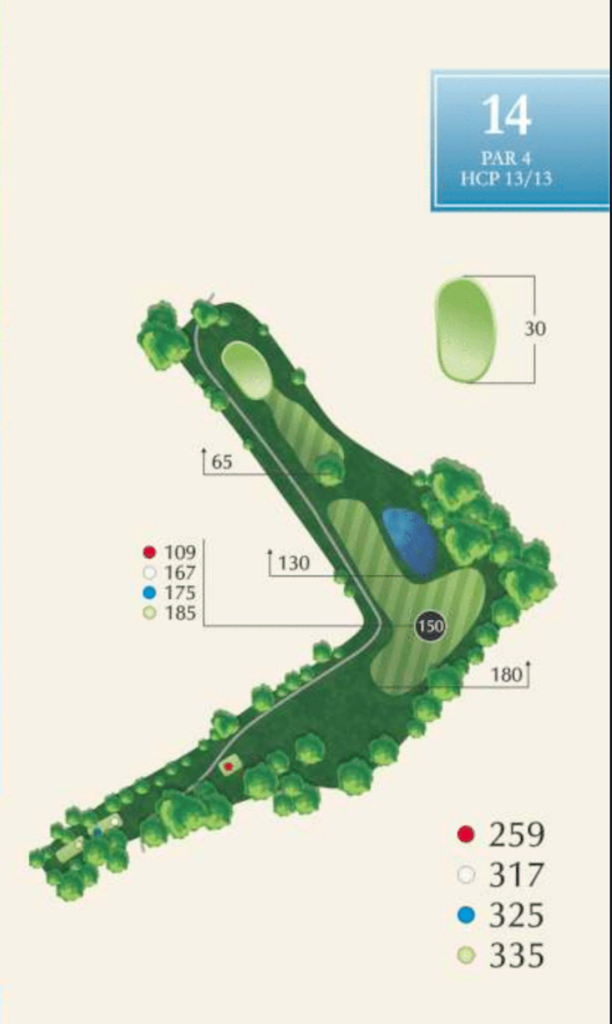
14
Par 4
259
Forward
317
Middle
325
Back
335
Champ.
The 14th hole is a dogleg left par 4. This is a true “two-shot” par 4 as players are forced to place their tee shots right of the pond in order to have a good look at this back-to-front sloping green. Two solid 8 irons is the play here at the 14th.
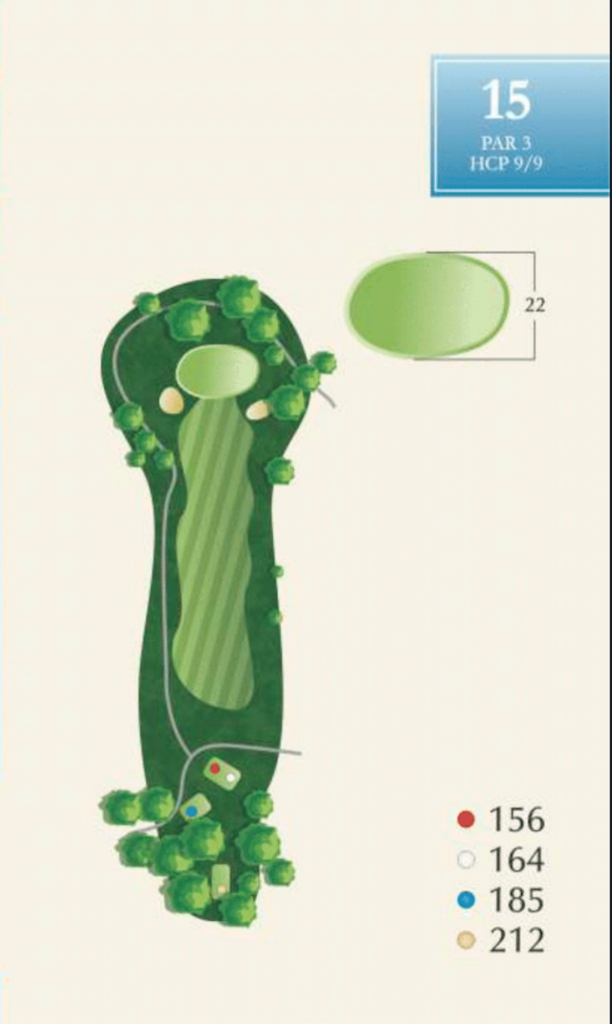
15
Par 3
156
Forward
164
Middle
185
Back
212
Champ.
This difficult, downhill par 3 requires distance and accuracy from the tee box. The green is protected on the right side by a large oak and the two green side bunkers see a lot of action during a busy day. A par on this hole is an accomplishment for any skill level.
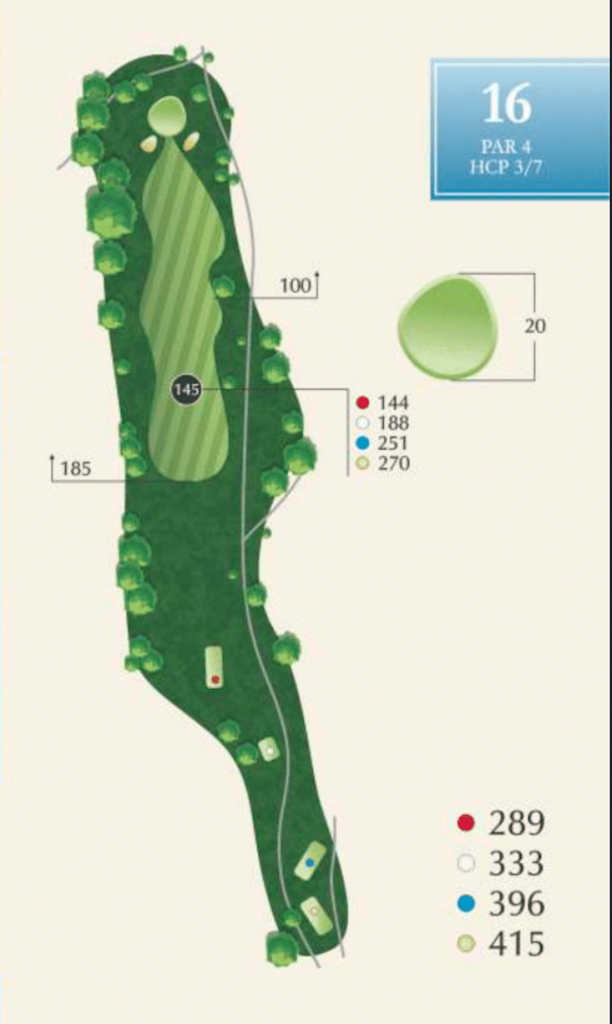
16
Par 4
289
Forward
333
Middle
396
Back
415
Champ.
This is a long, straightaway par 4 test. An undulating fairway awaits the tee shot and a back-to-front sloping green is guarded by two deep bunkers. A solid tee shot will leave the player with a medium to short iron. As with any of the finishing holes here, par is a good score.
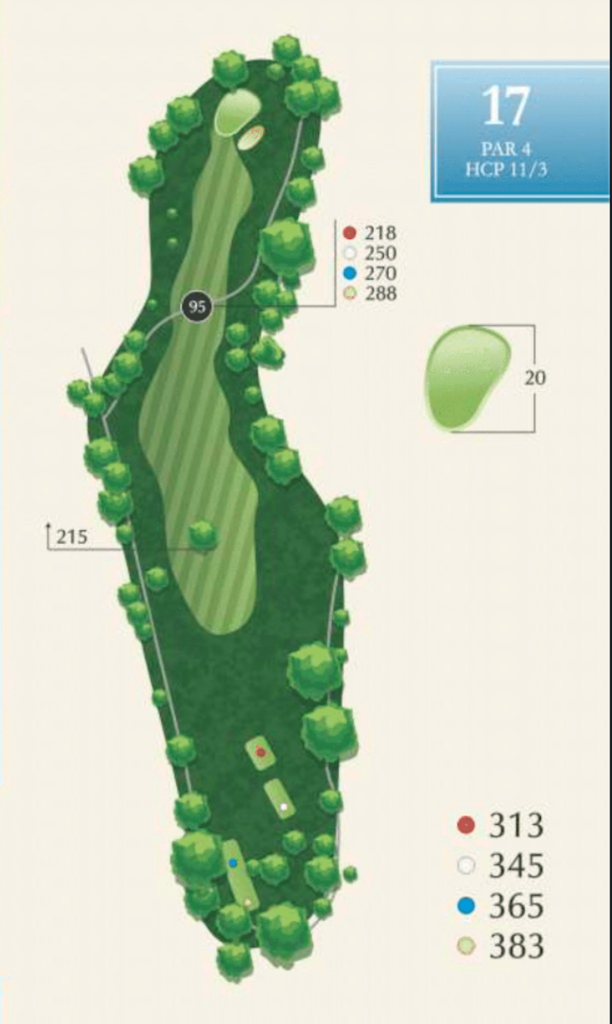
17
Par 4
313
Forward
345
Middle
365
Back
383
Champ.
The 17th hole is a beautiful, traditional dogleg right par 4. The tee shot is guarded by a large oak in the center of the landing area. The key here is to shape the tee shot accordingly in order to provide a good look at this small green. Players must guard against a tee shot that drifts to the right, because the fairway is heavily lined with huge pine trees.
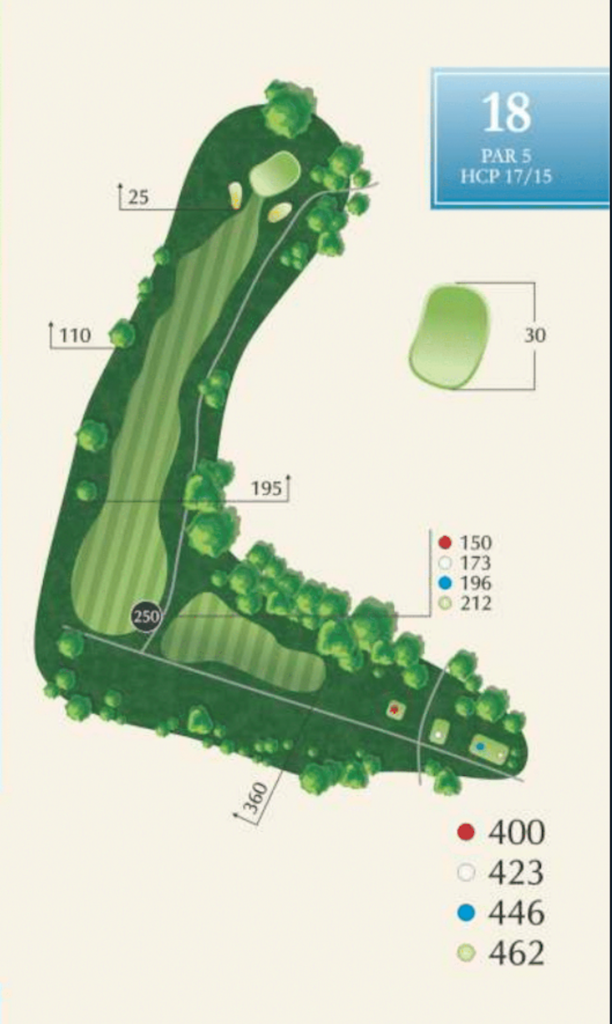
18
Par 5
400
Forward
423
Middle
446
Back
462
Champ.
The 18th hole at McAlester County Club is a great finishing hole. This dogleg right requires a solid tee shot onto an elevated fairway. The right side is lined with out-of-bounds stakes and better players often flirt with danger in order to have a shorter approach into this classic par 5. The green is tiered and protected by two large bunkers. This hole provides the player with one last chance for birdie and the occasional eagle.
every hole also has its own page, with the diagram at full size and the club’s full description.
Play the course as a member
Full golf membership includes unlimited play, the practice facility, and entry to club tournaments.